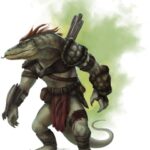
Shrine of the Soil Serpent Marketplace Map

Map of horizontal street, slate roof buildings and merchant tarps

#gallery-1 { margin: auto; } #gallery-1 .gallery-item { float: left; margin-top: 10px; text-align: center; width: 33%; } #gallery-1 img { border: 2px solid #cfcfcf; } #gallery-1 .gallery-caption { margin-left: 0; } /* see gallery_shortcode() in wp-includes/media.php */


Shrine of the Soil Serpent Full Version

Shrine of the Soil Serpent: A Limitless Heroics Adventure. Stone ruins with a blue sky in the background

Shrine of the Soil Serpent

Soil Serpent Maps

soil serpent epub

Shrine of the Soil Serpent (plain text)


Horror of the Shade Full Version

Horror of the Shade cover with wraith against purple background

Horror Of The Shade With Alt Text

Horror of the Shade Maps

horror of the shade epub

Horror of the Shade (plain text)


Shrine of the Soil Serpent

Shrine of the Soil Serpent: A Limitless Heroics Adventure. Stone ruins with a blue sky in the background

Content Warning

This adventure includes death and violence, undead, and kidnapping.

Can you stop the serpent god?

Lizardfolk have been kidnapping people from the village to summon an ancient serpent god. Can you prevent the return of the Soil Serpent?

This one-shot adventure is designed for 4-5 characters, levels 5-8, with a total of about 24 levels.

About this Adventure

The village of Cleargrove endures increasing attacks by lizardfolk, and scouts from the village believe they’re planning to recover a staff hidden within the haunted ruins of the Shrine of the Soil Serpent. A representative from the village asks the party to recover the staff to keep the lizardfolk cultists from getting it and summoning the soil serpent, an elemental snake god. When the party reaches the inner court, they find that the staff is a stalk, the stem of a potted carnivorous plant. The lizard folk try desperately to acquire the plant, as it has charmed them into bringing it victims. If the party brings the plant to the village, the representative will plant it in the ground, claiming that it will grow fruit to keep the lizardfolk away, but once planted, it quickly grows into a monstrous attacking plant, allied with the village representative.

Adventure Hooks

This adventure begins in any population center. It’s written for a village, but the size of the community is of little importance besides the availability of a town guard to handle the lizardfolk; even if the guards protect the community, the party can still be enlisted to investigate the sudden increase in attacks.

The adventure takes place in the village of Cleargrove, but you could use any community in your campaign world that’s near a forest, rainforest, or swamp.

Dramatis Personae

Lizardfolk Ambush

Shrine of the Soil Serpent Marketplace Map

lizardfolk hunterWhile the party is going about their business in town, they hear a scream as 3 Lizardfolk Plant Ghouls grab 2 villagers and attempt to drag them away. They appear to be typical lizardfolk, except they don’t speak. A successful DC 10 Wisdom (Perception) check when within 5 feet of them reveals that they smell like a combination of rotten meat and a clove-like spice.

Once the party defeats them and rescues the villagers, Elel Talthanryl, who owns a greenhouse in town, approaches the party and thanks them profusely. He explains that they’ve been having problems with lizardfolk attacks, dragging away villagers. As soon as the party asks any questions, Elel says, “We’ve sent some scouts to find out. Let me get them for you.” He walks over to a nearby merchant tent where Ryia and Erelmil are chatting with a vegetable seller. He introduces the pair to the party.

Roleplaying the Scouts

Since Ryia has difficulty speaking due to pain in her mouth, the GM can emulate this either by speaking quietly with minimal lip movement or by describing her speech, such as, “She speaks quietly, but if you listen closely, you can hear her say….” Especially when playing in noisy environments or remotely, this descriptive narration will give players insight into Ryia’s experience. At times, Ryia may gesture to Erelmil, who’s used to listening to her, to repeat what she said or expand with his own experience, but only when she asks him to.

When Erelmil is in combat, he will use his hand crossbow from a distance, then sneak attack and cunning action to strike and hide. While hiding, he may take that opportunity to reload his hand crossbow when it’s prudent to keep his distance. When Ryia uses the same tactic and hides near Erelmil, she can help him load it, using one of her multiattack actions or a bonus action.

The scouts are eager for the party’s help. As the party asks questions, they will be able to give the following information:

  • Six people have been kidnapped from the village of different ancestries and ages. Ryia and Erelmil can determine no pattern to the kidnappings.
  • The kidnappings started about 30 days ago. Before this, lizardfolk rarely came near the village and generally kept to themselves in nomadic families throughout the area but sometimes came into town to trade goods or information, and besides some misunderstandings with some local farmers, interactions with them have always been positive.
  • If asked, nobody has heard the attacking lizardfolk speak, not even to each other, which is unusual.
  • They’ve been tracked to the ruins of the Shrine of the Soil Serpent, which has been abandoned and overgrown for centuries. Nobody goes there, because it’s haunted. If pressed, nobody can remember details about that except that the story goes that those who’ve gone near it disappeared, and some stories say that the missing people were seen later as zombies.

When Elel hears of the shrine, he becomes horrified. His monocle drops from his eye, and he grabs it and puts it back in place. He says, “Oh no! They must be seeking the staff!” When the party asks about the staff, Elel informs them that the Staff of the Serpent is believed to be buried deep in the shrine, and those who possess it can use it to summon the Soil Serpent, an ancient snake god that legends say came up out of the earth to consume and dominate the world. However, the staff is also believed to be capable of destroying the Serpent instead of just banishing it, which is why the staff was buried, not destroyed. Elel urges the party to go and recover the staff to keep it from the lizardfolk, and possibly destroy the Serpent once and for all.

If the party asks Ryia and Erelmil to come along, they’re willing to take the party within sight of the shrine but refuse to get any closer, and will immediately return to the village.

Trek to the Shrine

Shrine of the Soil Serpent Forest Map

The shrine is about three miles from the village in a dense part of the forest. Erelmil and Riya can give detailed instructions but have no desire to go back. When they say, “It’s just past this next hill,” 4 more Lizardfolk Plant Ghouls ambush the party, throwing their javelins while hiding in the trees, then leaping on the party.

The Shrine of the Soil Serpent

The ruins of the shrine are home to a vast network of vines, but as you get closer, you see a door to a buried complex, a pile of rubble that seems as if it would collapse were the vines not holding it together. A snake slithers out from between the cracks and darts to catch a rodent, taking its mouthful of prey into another crevice. The sun shines down on an 8-by-8-foot square stone doorway with seemingly more gaps than stones, yet it still stands.

Shrine of the Soil Serpent Shrine Map

  1. Entry Chamber. As the party approaches the doorway, the air fills with the combined odors of mildew, rotten meat, and a clove-like spice. The doorway leads to a wet stone hallway with a slight downward slope. Anyone walking must succeed on a DC 8 Dexterity (Acrobatics) check or fall prone. Anyone in a wheelchair or similar mobility aid makes the check with advantage and slides to the bottom without becoming prone on failure.

The rectangular room is decorated with serpentine green and orange patterns, most of the paint having long since faded. A small snake comes out of one crack in the wall to the left and immediately disappears into another crack on the same wall. Another doorway lies ahead.

  1. Former Priest Living Quarters. A sink, fire pit, and rotted wood that used to be furniture are all that remains of the possessions of the priests that used to serve this shrine. If the party investigates the piles of wood, they’ll find a chest within, which nearly falls apart on opening, revealing rotten clothing and disturbing a Swarm of Centipedes within that will attack the party unless someone is carrying a fire source. The swarm will scatter at the first sign of fire.
  2. Discard Room. The smell of rot gets stronger as you approach. The floor is scattered with torn and moldy fabric and bones, some of which still has rotten flesh attached. A few rats scurry from pile to pile, and a constrictor snake crawls out from under one of the larger piles. It will threaten the party for a round by coiling for a strike, but if the party backs off, it will go snatch a rat instead, only fighting in self-defense.
  3. Guard Chamber. As the party enters this large stone chamber, strewn with broken furniture, they notice the smell of rot and spice getting stronger, almost unbearable, especially for those with sensitivities to strong odors. A Plant Ghast and 3 Plant Ghouls, which look identical to their undead counterparts, spring from behind the furniture to attack, attempting to surprise the party. They will fight to the death as they try to protect the Staff of the Serpent from intruders, targeting anyone wielding fire first.
  4. Chapel. The serpentine patterns on the walls extend to the floor, forming a spiraling pattern that surrounds an altar in the center of the room. The first character to touch the altar each day heals 1d8 hit points. If a second person touches it, vines spring from the cracks, and the character must succeed on a DC 10 Dexterity saving throw or be grappled for 10 minutes or until the vines take 20 points of fire or slashing damage.
  5. Sanctuary of the Staff. The serpentine walls and floor of this room’s design are accented with gold flake, which reflects the faint light that pokes through cracks in the ceiling, making this dim light the brightest room in the shrine. The air has become so damp that condensation on the broken ceiling drips from its jagged edges. The clove-like smell hangs heavily in the air, stronger here than anywhere else. In the center of the room, a 2-by-2 feet cylindrical metal pot of dirt decorated with cobra designs holds a 6 ft. vertical green shaft wrapped in snake-like vines. On inspection, the party can see roots extending from its base into the dirt, and the vines have tiny buds protruding from them, and the clove-like smell gets stronger near it. The potted plant is the Staff of the Serpent, and the party can move it, but it weighs 250 pounds. Removing the staff from the pot will not destroy it.
  6. Former Ritual Preparation Room. This room contains a rotting table and cabinets, coils of rope, a rusty round shield with a two-feet diameter dirty water ring in the center, and several rusty and blood-stained manacles and cutting tools. Close inspection will reveal a rusted metal box in the cabinet with 212 sp and 76 gp.
  7. Antechamber. This room has a wooden trapdoor in the ceiling that’s cracked open just far enough for the legs and bottom rung of a ladder to protrude. A braided cable hangs down from it to 6 feet from the floor. A player pulling on the cable can release the jammed hinges with a successful DC 8 Strength check. Once released, the door opens, and while the ladder remains attached to the door, a heavy paper box full of mold falls out and fills the room with toxic spores. All creatures in the room must succeed on a DC 14 Constitution saving throw or take 13 (4d6) poison damage and be poisoned for 2 hours. A character attempting to catch the box as it falls must succeed on a DC 10 Dexterity check. On success, they prevent its spread to others but get a face full of spores and must make the saving throw with disadvantage. Any amount of fire or cold damage sent into the opening before pulling the door will destroy the mold and ruin the effect. The space above the trap door is an otherwise empty cavity.

Returning the Staff

monster carnivorous plantOnce the party returns the staff to the village, Elel excitedly takes the staff and looks for a patch of open ground to plant it. He explains that the buds will produce fruit that’s needed for the ritual to destroy the serpent. As soon as the staff gets planted, it grows in 1 round into the Soil Serpent. It attacks the closest creature but will not attack Elel, who is thrilled that his plan as the secret leader of the Cult of the Serpent is succeeding. If the party is having trouble defeating the Soil Serpent, Riya and Erelmil will arrive and join in the combat at the beginning of the third round of combat, and the town guards will arrive and join in during the fourth round (as many as necessary).

Seeds of Future Adventures

Once the Soil Serpent is destroyed, the town guards will arrest Elel. If the plant isn’t burned completely, the wind will carry its seeds away where another staff will begin to grow….

Credits

Writer: Dale Critchley

Copy Editor: Naomi Hazlett

Sensitivity Readers: Naomi Hazlett, Melissa Critchley, Simone Arnold, Matthew Rickmon, Amy Weisner

Layout Editor: Beth the Bard

Stock art by Jacob Blackmon and Adela Quiles

Maps by Dale Critchley, © 2022 Wyrmworks Publishing


Time Is of the Essence Full Version

Time Is of the Essence cover: Time storm image

Time-Is-of-the-Essence-1.1 full PDF

Time Is of the Essence 4K Maps

Time Is of the Essence Map Keys


Potion of Cheerful Thoughts

a glass goblet of eggnog

Potion, rare

When you drink this potion, you gain the following benefits for 1 hour:

  • You have advantage on saving throws against spells and other effects that would cause you to be charmed or frightened.
  • You gain resistance to psychic damage.
  • You have advantage on Wisdom (Insight) checks to determine the emotional state of others.

After the potion wears off, you must succeed on a DC 10 Wisdom saving throw or acquire a temporary Baseless Emotion or increase an existing one by 1 Impact Extent for one hour


This potent potion is designed to treat individuals struggling with depression and anxiety. However, when it wears off, the effect rebounds.

It is made using a blend of Christmas spices and enchanted eggs from the rare and elusive Jinglebird.

To create the potion, the following steps must be followed:

  1. Gather the following ingredients:
  • 1 Jinglebird egg
  • 1 pint of fresh cream
  • 1 cup of sugar
  • 1 teaspoon of cinnamon
  • 1 teaspoon of nutmeg
  • 1 teaspoon of allspice
  1. Crack the Jinglebird egg and carefully separate the yolk from the white.
  2. In a large mixing bowl, beat the egg yolk with the cream and sugar until well combined and smooth.
  3. Add the cinnamon, nutmeg, and allspice and mix until fully incorporated.
  4. Transfer the mixture to a small pot and heat over low heat, stirring constantly, until it reaches a thick and creamy consistency.
  5. Once the potion has reached the desired consistency, remove it from the heat and carefully transfer it to a small glass vial.
  6. The potion is now ready to use! To use the potion, simply drink it and allow it to take effect.


Time Is of the Essence

Time Is of the Essence cover: Time storm image

May I take some of your time?

Will you stand the test of time?

This adventure is for 3–4 characters, level 11–13, with 40–50 combined levels.

Background & Synopsis

The party arrives at the Castle of Lord Remington, a historian and collector of timepieces and host of the most lavish New Year’s Eve gala in the land. As they enter, they find the guests frozen in time, suspended in mid-movement and conversation. As the party investigates, they learn that Lord Remington has been stealing their time to extend his own life, leaving the guests in a state of suspended animation. Meanwhile, his time manipulation experiments have caused time on the grounds to fluctuate and warp, leading to many strange effects.

The party must navigate the castle, encountering various obstacles, time aberrations, and enemies along the way.

The adventure unfolds as the party investigates the castle, culminating in a battle with Lord Remington’s clockwork assistant and eventually Lord Remington himself to reset time.

Adventure Hooks

This adventure can serve as a side quest or as a way to launch a campaign of urban intrigue or planar encounters.

Where are we?

This adventure can occur in any large city or district with affluent noble houses. For those using the Andovir campaign setting, this adventure would take place in Sky.

Download all maps and map keys

Right on Time

As the party approaches the castle, they can see that it is surrounded by a high, fortified stone wall with towers at each corner. The gates to the castle are made of thick, ornately carved wood, adorned with intricate brass clock faces. The castle itself is made of dark, imposing stone, with tall, narrow windows and a grand, arched entranceway. The roof is tiled with black slate, and a tall clock tower rises above the castle at the northeast corner.

As the party arrives at the main gate of the estate, the attendant, a well-dressed half-orc named Hunin, pulls a pocket watch out of his coat pocket, checks it, and welcomes the party with a formal but friendly demeanor. Mumbling, “It’s about time,” under his breath, he leads them up the road from the gate to the castle, then through large arched doors to the foyer leading to the great hall. Quiet relaxing music echoes through the doors. Hunin says, “Right through that door. Have a good time,” and leaves to return to his post at the main gate. (Proceed to “Great Hall: Keeping Time with the Music” below.)

Castle Grounds

Lord Remington's Castle, Ground Floor Map

If the party investigates the grounds, they find themselves having trouble keeping track of how long they’ve been there, whether minutes or hours, and looking at the clocktower only causes them to question whether the clock is broken. This is not an illusion. Time fluctuates on the grounds. The servants all carry pocket watches to keep track of time, since they know they can’t trust their senses.

Courtyard: The Past Comes Back to Bite You

Time fluctuates in the courtyard. As the party approaches the fountain, a complex water clock, it vanishes, replaced by a sprawling fern and a triceratops. The triceratops, disoriented, attacks the party for two rounds.

triceratopsAt the end of the second round, it and the fern vanish. In their place, a rusty metal four-wheeled vehicle appears. Standing atop the vehicle, two cyberzombies spot the party, and in a metallic voice, say, “Curfew Violation!” and attack the party. After two rounds, the cyberzombies and vehicle vanish, and the water clock fountain reappears.

Servant Quarters

A row of simple cottages where the castle staff live are made of stone and have slate roofs. Each cottage has a small garden out front, where the staff members can grow their own vegetables and herbs. Inside, the cottages have a main living area, a bedroom, and a kitchen. If approached by the party, the staff will resist giving any information unfavorable to Lord Remington out of fear of his wrath and losing their livelihood. A successful DC 10 Charisma check will convince one to reveal that he’s very punctual; DC 15, that he’s sad about his mother dying young; DC 20, that he’s been heard talking about immortality; DC 25, that strange clicking and zapping sounds and voices have been heard in the dungeon, but nobody is allowed in there.

Near the cottages, a much larger garden provides food for the rest of the manor.

Chapel: Serving Time

The Chapel of Temporia is a grand, marble structure adorned with intricate carvings of swirling patterns and hourglasses, representing the goddess of time’s domain. The chapel is surrounded by a beautiful, well-manicured garden filled with plants and flowers that bloom, close, then bloom again, as time reverses to close them and moves forward to open them in an endless cycle, never wilting.

The interior of the chapel is equally impressive, with high, vaulted ceilings and beautiful stained glass windows depicting scenes from the goddess’s myths and legends. Torches and candles burn, but the flickering moves noticeably slowly, barely moving, thus they take years to burn down.

Waiting Room. This foyer has a twelve foot diameter clock on the wall. An hourglass ten feet high with a five foot diameter in the center of the room has a whirlwind of sand within that seems to move upward and downward at the same time.

Main Hall. The main hall is rectangular with pews surrounding a central altar. The altar looks like a large golden sundial, and the walls have weighted chains that control clocks and clockwork devices within the walls, including a massive clock face on the ceiling.

skeleton with armor and swordHall of History. This room, dedicated to the past, has a wall lined with history books and artifacts from ancient civilizations, including coins, stone weapons, and three skeletons dressed in armor from past cultures. Anyone moving within five feet of the wall must succeed on a DC 15 Wisdom saving throw or be affected by a Slow spell until moving outside the area of effect. This enchantment preserves the books and slows their degradation.
The opposite wall is completely covered by tapestries depicting the goddess throughout different historical eras.If anyone touches an item on one of the shelves, the skeletons animate into three Historical Remains and attack the party. If the party leaves the room, the skeletons return to their places and appear as they did when first observed.

Shelf of old books

Present Passage. The walls of this hallway are covered in sand, which moves from the Hall of History around a corner to the Impending Expanse, where it turns to fog. Those in this passage feel themselves being pushed through it and must succeed on a DC 10 Strength check to stand still or a DC 15 Strength check to move toward the Hall of History.

Impending Expanse. This room, filled with fog, has no exit, and once a creature enters it, the doorway from the Present Passage disappears. The room has no discernable walls, and attempting to find a wall or exit will bring the person to a random location in the room. The only object in the room is a marble lectern with today’s date inscribed on it with the words, “Seize the day” written in Primordial. If the pedestal is destroyed, it will reform as fog coalesces in a random location in the room after one minute.

While in the room, inhabitants will experience hallucinations of future events through one random sense at a time, but all of the experiences will be vague, clouded, and sometimes contradictory, such as the same throne with different monarchs, a family in varying degrees of health, or a village thriving or destroyed.

The only way to leave the room is to touch the lectern for two rounds, at which point the creature is transported to the Waiting Room.

Other Buildings

Other buildings on the property include:

a stable filled with horses, donkeys, and mules

Two barns with cows and pigs, slightly smaller than the stable

A storage shed with farming and other maintenance tools

A granary

A building near the manor gate that functions as both brewery and smokehouse

Castle

Ground Floor

A dirt road leads from the gate to the castle’s entrance in the southeast tower, which has doors leading to the perimeter hallway and other towers. Each tower except the northeast one has a spiral staircase leading to the second floor and its top, but the towers have no other doors besides the wide hallway that surrounds the interior of the castle. The northeast tower has no apparent means to access the top.

Great Hall: Keeping Time with the Music

The Great Hall of Lord Remington’s castle is a vast, high-ceilinged chamber filled with the sounds of ticking and whirring. The walls are adorned with intricate clocks and tapestries depicting scenes of battles from ages past, and the floors are made of gleaming marble. At one end of the hall stands a grand fireplace, its flames casting a warm glow over the room, although the flames move noticeably slower than expected, creating an undulating effect instead of flickering.

In the center of the hall, a twenty foot tall clockwork pillar stands, made of brass and copper, with intricate gears and levers visible through its transparent panels. The device is constantly in motion, the gears turning and the levers shifting as it plays a series of intricate melodies on its collection of pipes and bells.

Dozens of local nobles stand immobile throughout the room, frozen in mid-movement, servers frozen with them. Any attempts to alter them, move them, or steal from them will fail, as time has been removed from them, thus they cannot be altered in any way.

Throne Room: Fight Against Time

The throne room is a grand chamber with high, arched ceilings and stone walls adorned with intricate clock faces. A massive throne of silver and marble sits at the far end of the room, surrounded by tall, timekeeping mechanisms and hourglasses. The floor is made of polished marble, with a large sundial inlaid in the center.

The room is guarded by a time elemental, summoned by Lord Remington to stop anyone who would interfere with his plans.

blue face with swirl design and red eyes floating in rainbow space 

Armory: Guard Your Time

man holding up sword wearing armor

The armory is filled with an array of shields and weapons. The shields have Lord Remington’s crest on them, a tree with an hourglass-shaped trunk and a banner that says, “Time Is Eternal,” in Primordial. The weapons include morning stars with hourglass-shaped heads and longswords with hourglass pommels. The most impressive weapon in the armory is a greatsword with a golden, hourglass-shaped hilt.

Three time wardens, guards enchanted with temporal magic and charmed into aiding Lord Remington at all costs, attack the party. Dispel Magic cast on a guard will remove both their Time Loop ability and the charm.

Banquet Hall

The banquet hall has high ceilings and walls adorned with intricate frescoes depicting scenes of ancient civilizations. The floor is made of gleaming white marble, and the hall is filled with long tables and chairs with a primary table that is more decorative than the rest. A fresh banquet fills the center table, but the steam that wafts from the hot dishes moves with the speed of a clock’s minute hand, even as it responds to air movement in the room.

The chandelier has twelve radial arms with nearly stationary flames.

Second Floor

Lord Remington's Castle, Upper Floor Map

Hallway: At this Juncture in Time

gold cog clockThe red carpet in the hallway has a time loop enchantment. As the party moves down the hallway, once they reach the section where the hallways intersect or try to step through any of the doors, the party loops back in time to the beginning of the hallway when they first stepped onto the carpet, reliving the same events over and over again. (Game Master: When it loops, use the same words you used when they first opened the door, e.g., “You step through the doorway into a hallway with a red carpet, a door on either side of you, and an intersection up ahead.”) Every time they reach the intersection or walk through a door, they are transported back to the beginning of the hallway.

  • Any damage or effects that the party suffers in the hallway are reset each time they are transported back to the beginning.
  • Any actions or abilities used by the party are also reset each time they are transported back to the beginning.
  • The enchantment is tied to the carpet itself, so flying, climbing the wall, or some other means of movement without touching the carpet will allow the party to escape the loop.
  • If one member of the party gets beyond the loop and tries pulling another party member in contact with the carpet, the one who is beyond it stays in the present, while the one touching the carpet returns to the past.
  • Damage done to the carpet will activate the loop, returning the party to the beginning of the loop.
  • When anyone activates the loop, everyone on the carpet returns to the beginning.
  • A character in a wheelchair or other mobility device that keeps their body more than two inches from the floor is not affected by the loop.

Library

The library, filled with tomes of history from many lands, has a portrait on the wall of a young noble family: father, mother, and son. If the party examines the books on the shelves, a successful DC 15 Intelligence (Investigation) check reveals a trend among the history books that focus on demigods and undead and a few books not specifically history related, including titles such as The Chronomancer’s CodexThe Timeless Tome: A Treatise on the Nature of Time, and Echoes of the Past: Exploring the Role of Time in Magic and Myth.

library shelves 

Bedchamber 1

Lord Remington’s bedchamber is filled with expensive furnishings. The walls are adorned with gold leaf and a portrait of the woman in the library portrait, and the ceiling has an intricate fresco depicting a phoenix rising from the ashes. The bed is a grand four-poster with plush velvet curtains and a mattress filled with goose down. A large clock stands at the foot of the bed, its hands moving counterclockwise. A grand fireplace with a marble mantelpiece is the centerpiece of the room, and four large, intricately carved wardrobes stand across one wall. The smells of lavender and rosewater fill the room.

Bedchamber 2: Life Is Short and Time Is Swift

This chamber fluctuates to show scenes of the room in random order from the past, present, and future. In the past scenes, the room is spotlessly clean, and in many of them, a young woman with a man and child sitting beside the bed, the same family as in the library portrait. The woman usually appears pale and lethargic, but some scenes show the boy sitting in the bed with her as they happily read together. Some scenes show the man crying beside an empty bed. Present scenes depict the same room, covered in dust and unoccupied. In future scenes, the room fills with cobwebs, more dust, and other signs of age and neglect.

Bedchamber 3

The guest bedchamber is a spacious and elegant room, designed to accommodate visiting noblemen and other dignitaries. The bed is a large four-poster with a plush mattress and fine linens, and the room is filled with comfortable chairs and a writing desk. The walls are adorned with tapestries and paintings depicting scenes of history and grandeur. A fireplace has a marble mantelpiece, and a wardrobe stands in one corner, filled with a selection of fine clothing in various sizes.

Basement

Lord Remington's Castle, Basement Map

Wet Larder

The wet larder is a dimly lit chamber filled with rows of damp, stone shelves. The room is chilled to a constant, frigid temperature, and the air smells of dirt but not decay. Barrels of brined meat and vegetables fill the floor, and on the shelves sit countless jars and bottles containing various preserved body parts and organs, all belonging to various creatures that Lord Remington has collected over the years.This room has a permanent Slow spell on it, used to preserve food longer.

Dry Larder

3 potionsThis dimly lit room has shelves and barrels stocked with herbs and spices, dried meats, jars of pickled vegetables and fruits, bags of grains and beans, jars of honey and other sweeteners, bottles of vinegar and other preserving agents, and casks of wine and other alcoholic beverages. The southeast corner with the alcohol has a permanent Haste spell on it to speed the aging process.A DC 10 Intelligence (Arcana) check observes that many of the herbs and other uncommon materials may be used in potions and other magic used to counteract aging.The room also has a wooden cabinet filled with containers and tools used in the brewing and preparation of potions, such as cauldrons, alembics, and mortars and pestles.

Kitchen

The air is thick with the scent of freshly cooked food, and the sound of pots and pans clanging fills the room. The kitchen staff is busy cleaning up, scrubbing pots and pans, and putting away ingredients. The staff moves at an unnaturally fast pace, as a Haste enchantment speeds their work, but they appear tired from the magic’s effects.

Dungeon: Beat the Clock

steampunk stretcher machineThe dungeon is a dark room filled with strange and unsettling equipment. The walls are made of rough stone, the door of heavy iron, and the room is lit by glass cylinders with flickering electricity writhing through them. A table in the room has attached shackles and wires and tubes laid out as if waiting to connect to a humanoid body. In the northeast corner of the room stands a locked reinforced door, and between the cages and the corner door, a clockwork servant named Clockwinder guards three iron cages holding the shackled people, RendoyaZinn, and Lara, that Lord Remington has been experimenting on.When the party enters, the prisoners, tired from their trauma, perk up at the unexpected intrusion but still show their fatigue. Rendoya begins pointing at the wall, which has several dials and levers, and signing in Draconic Sign Language, while the others ask to be set free.ALT TEXTOne of the levers on the wall unlocks the shackles, at which point the prisoners attack Clockwinder.Another lever opens a panel in the wall, revealing a swirling portal that leads to the observatory.Another lever causes a large machine beside the levers to start up and short circuit. Anyone within fifteen feet of the machine must make a DC 14 Dexterity saving throw, taking 4d6 lightning damage on a failed save or half as much if successful.Tampering with the other machines in the room will cause a similar lightning shockwave. Lord Remington hasn’t succeeded yet on his attempts to get these “Vitality Machines” to work.If the party frees the prisoners, they insist that they can handle Clockwinder and tell the party to take the portal to stop Lord Remington before it’s too late.

Clock Tower: Killing Time

Lord Remington's Castle, Tower Map

When the party comes through the portal, they find themselves at the top of the clock tower, and the portal closes. The tower has no other means of escape.

clockwork dogLord Remington, guarded by his Chronies (TimekeeperBig Time, and Time Bomb), hears the sound of the portal as he manipulates a huge clock-like device and a large glowing hourglass. Frustrated, he shouts, “No! I don’t have time for this! I need more time! I will not have my time taken from me! How did you get past Clockwinder?”
If the party tells him about the prisoners escaping, he says, “Fine! If they get away, I’ll just have to spend some time on you instead! You look almost as powerful as they are — I’ll have to settle,” and he and the Chronies attack the party.
The device has 55 HP with a 19 AC.
During the battle, the environment constantly changes. At the beginning of each round, roll 1d20+4 for the hour of the day, 1d4 for the season (winter, spring, summer, autumn).
Anyone who attempts to leave the tower through flight, teleportation, or some other means must attempt a DC 18 Wisdom saving throw. On success, the character reappears where they were at the beginning of their turn, but any spell slots or other expended resources remain expended, but the character can take another action. On failure, the character gets lost in the timestream and returns to the closest empty space at the beginning of the next round, has aged 1d4 years, and has only a vague memory of their time in the timestream.

Crunch Time

At the beginning of the second round, the glowing hourglass explodes. Everyone in the tower must succeed on a DC 16 Dexterity saving throw or take 2d8 slashing damage, half damage on success. The tower begins to shake as temporal forces rock the environment. A storm begins with sudden heavy precipitation appropriate to each round’s season.

At the beginning of the third round, everyone must succeed on a DC 16 Dexterity (Acrobatics) check to avoid falling prone and cannot stand without succeeding on another Dexterity (Acrobatics) check as the tower’s shaking becomes more violent. Characters in wheelchairs or similar devices have advantage on the check.

At the beginning of the third round, the tower begins to collapse. Everyone must succeed on a DC 18 Dexterity (Acrobatics) check or take 1d6 bludgeoning damage as they begin to fall, and rocks crash around them. Those with the means to avoid falling damage (e.g., a Feather Fall spell or a monk’s Slow Fall feature) take no damage from the fall. All melee attacks are made with disadvantage, and maintaining concentration requires a successful DC 15 Constitution saving throw.

These effects last until the end of the sixth round, at which point everyone falling hits the ground and takes 4d6 bludgeoning damage. At the same time, the sundial device crashes to the ground, and shatters. Any remaining Chronies, which drew their power from the temporal energies of the device, deactivate. The party finds themselves on the ground between the northeast tower and the fountain.

Dial It Back

The environmental time anomalies stop, and the time of day and season return to the moment the party arrived at the castle, and the tower returns to its original condition. If Lord Remington is still conscious, he will attempt to return to the top of the tower to try again, since time has reset, and the time device is once again intact but not yet activated. If Lord Remington is dead or otherwise prevented from returning to the tower, Hunin comes out of the castle, approaches the party, looks around, checks his pocket watch, nods his head, smiles, and says, “It’s about time.” He invites the party into the ball, where the guests chat and dance around the musical pillar.

brass steampunk clocks

Dramatis Personae

cyberpunk clock

Credits & Copyright


Kassios

Kassios (He/Him)

Medium Fey (satyr), chaotic neutral

  • Armor Class 14 (leather armor)
  • Hit Points 31 (7d8)
  • Speed 25 ft., 35 ft. with cane
STR DEX CON INT WIS CHA
12 (+1) 16 (+3) 11 (+0) 12 (+1) 10 (+0) 14 (+2)
  • Skills Perception +2, Performance +6, Stealth +5
  • Senses passive Perception 12
  • Languages Common, Elvish, Sylvan
  • Challenge 1/2 (100 XP)

Magic Resistance. Kassios has advantage on saving throws against spells and other magical effects.

Spellcasting. Kassios is a 3rd-level spellcaster. His spellcasting ability is Charisma (spell save DC 12, +4 to hit with spell attacks). Kassios has the following bard spells prepared:

Cantrips (at will): Mending, Light, Vicious Mockery

1st level (4 slots): Charm Person, Identify

2nd level (2 slots): Hold Person, Suggestion

Actions

Ram. Melee Weapon Attack: +3 to hit, reach 5 ft., one target. Hit: 6 (2d4 + 1) bludgeoning damage.

Shortbow. Ranged Weapon Attack: +5 to hit, range 80/320 ft., one target. Hit: 6 (1d6 + 3) piercing damage.

Sword Cane. Melee Weapon Attack: +5 to hit, reach 5 ft., one target. Hit: 6 (1d6 + 3) piercing damage. When used as a cane, this item reduces the IE of his Lower Body Stiffness by 1.

Variant: Panpipes. Gentle Lullaby. The creature falls asleep and is unconscious for 1 minute. The effect ends if the creature takes damage or if someone takes an action to shake the creature awake.

Traits

Kassios has Hearing Loss (IE 2) and Lower Body Stiffness(IE 2).

The caravan master is a charismatic satyr with sensational fashion tastes and a waxed mustache who uses a well-polished cane (actually a sword-cane). He possesses a cultivated theatricality developed during his past career as a troubadour.

The worldly Fey possesses knowledge of — and opinions about — almost everything, from classic Elven plays to the dramatic nuances of pyrotechnics. Kassios has a prosthetic bronze eye inlaid with an amethyst pupil. He also has hearing loss and wears a back brace beneath his ostentatious garb. 


Horror of the Shade Map 2

A map of the B rooms as described by the GM reference map. A yellow glow emanates from the left center. The circle on the right is a hollow black tree with roots breaking into B2 & B3 and beginning to come up through the floor in B4. A statue rests between the twin doors of B5. Around the B6 bridge is space and floating boulders.

Map of the extradimensional space in Horror of the Shade

#gallery-2 { margin: auto; } #gallery-2 .gallery-item { float: left; margin-top: 10px; text-align: center; width: 33%; } #gallery-2 img { border: 2px solid #cfcfcf; } #gallery-2 .gallery-caption { margin-left: 0; } /* see gallery_shortcode() in wp-includes/media.php */


Horror of the Shade Map 1

A map of the B rooms as described by the GM reference map. A yellow glow emanates from the left center. The circle on the right is a hollow black tree with roots breaking into B2 & B3 and beginning to come up through the floor in B4. A statue rests between the twin doors of B5. Around the B6 bridge is space and floating boulders.

Map of the initial temple encounter in Horror of the Shade

#gallery-3 { margin: auto; } #gallery-3 .gallery-item { float: left; margin-top: 10px; text-align: center; width: 33%; } #gallery-3 img { border: 2px solid #cfcfcf; } #gallery-3 .gallery-caption { margin-left: 0; } /* see gallery_shortcode() in wp-includes/media.php */